

OK, you have your 82-92 Firebird / Trans am, and you want to begin a conversion. What do you need, what colors, who to buy from or who NOT to buy from, how to install …the questions come flooding in to your mind. there is so much to take in, KITT / KARR is not an Easy replica, but Extremely rewarding, and so much fun as long as you don’t fall into the Drama pools.
First, we suggest that you don’t use the word “cheap” lightly. We see this far too often. Nothing in this build will be cheap. Be prepared to spend between $60.00 – $3200.00 in just one purchase. But we will try to help you with guidance on things to help smooth the path ahead, and help you with saving as much as you can. And for those looking at TurnKey replicas to buy, Please be advised, Anyone with the Skill-set, and Real knowledge, will charge around $50k, upwards to $80k to build. These replica’s are one of the most Difficult to build, Especially if you want the car to be Dependable, and Accurate to the show.
If you do not see a Particular question You have, Please e-mail us, so that we can Add it to this page, to help Many Future builders!

Vendor, Vendor, Vendor, Whodayatrust, hubba hubba hubba ,Whodayatrust????

Vendor, Vendor, Vendor, Whodayatrust, hubba hubba hubba ,Whodayatrust????
OK , So its a Different movie, but you get the jest…
That’s Why this site was created, to help remove any and all questions you may have. If its on this page, the vendor who supplies it is 110% Trustworthy, Always striving for excellence, and Always trying to make sure the customer is Completely satisfied. Please pay attention to some of the vendors you see, or some that may be suggested. A Few out there are Novice, and haven’t learned who to trust… We are the Signal in the sky, to help guide you to a Awesome replica!
One of our goals is to make sure you have a Fun build, and do not get taken advantage of by Known scammers…. and you don’t have to take Our word for it, Ask on Just about any FB Forum, You can get Unbiased reviews from Customers.
Please be Very mindful of where you purchase parts. The First, and Worst Repeat offender… is Vincenzo Forte, from Bari Italy. He has 2 Ebay accounts, kitt-vincenzo-knight and kitt-supercar, He Registered the Old account name of a Legitimate vendor, KRW, within hours of KRW Changing their Ebay account name to something that Vincenzo couldn’t confuse customers with. a Very Underhanded seller, and his Wife works with him to try and confuse, cheat and steal from Hard working replica builders.He also has a website… knightriderconversion. He is Very aggressive with trying to make sales. To date, we’ve been able to find over $75,000 he has taken in payment, and parts never delivered. He claims always the Best quality parts in the world, However, if you do Very little digging on Facebook, you’ll find Quite the opposite is said. However, it seems he is not that bad about shipping parts to people who live closer to him than USA… Gee, wonder why?
KnightRiderStore, Located in Estonia, Owned by Mr. Alvar Seeburg. He has been Sued, by former customers, for failing to deliver turnkey projects that were paid for, this is Public information that can be obtained from Estonia . Even some of his former suppliers have stopped selling to him because of his thefts. He has gotten a Few people to make claims of getting their items, and being very pleased, however there’s no proof of a transaction. And now, we are told even US Banks are giving customers Red flags when trying to purchase. Until We see something showing this individual has Gone on the Straight and narrow, we will Continue to Recommend customers avoid.
Levy Metal Enterprises aka Levin Lewis Sr, a New addition to our Suggested Avoid list. In our opinion, Trust is a Big issue…
How do i wire all my buttons and switches?
So you’re working on wiring, and you’re hoping to not release the magic smoke? Here we will give you Several diagrams, showing you how you can wire your various items in the upper and lower consoles This is for the Pilot upper consoles Red/Green rocker switches. This shows how to wire it to Light up and Trigger any relays if you want to attach


 Have Ideegeniali Electronics, and ZA PANP. This is also incorporating the Remote power module from Anthony Giannakis
 Something we see asked Often – How to add a second battery. This can be helpful for cars that will goto shows a lot, but you want to pay attention to how its set up. Using a good battery isolation is important. The illustration shows 1 12v feed from the rear of the car going forward, you can run a Dedicated line to each if you prefer, but each line Must be protected by a fuse. Ground wire will be ran from the electronics direct to ground, keeping it Short and to Clean steel
I Have Ideegeniali season 3/4 Electronics – What is the ” PB ” connection on my speedo for?
There are times when you need to program certain features made into the electronics, such as Fuel, Trip or the Odometer. That’s what the Push-button is for. any small SPST Button will do. there will be 2 pins only, and those will connect to the PB Port. the 2nd leg of the button will go to a Ground.
Speedo S1/2
Push-button cycles between FUEL, TRIP, TOT
FUEL -> estimated mileage with fuel in the tank
TRIP -> trip computer, re-settable
TOT -> total odometer, adjustable
Long press while on TRIP: resets partial odometer count to 000.0
Long press while on TOT: enters total odometer adjustment procedure
Speedo S3/4
Push-button cycles between Voltmeter, Trip A, Trip B
The status is indicated by one of the three yellow LEDs near the 4 digits 7-segment display
Long press while on TripA or TripB resets one of the two partial odometers to 000.0
Long press while on Voltmeter enters total odometer adjust procedure
Total odometer adjust procedure
One digit flashes: short press to cycle that digit
Long press to move to flashing next digit
There are 6 digits to adjust in total
Long press after 6th digit: exits the adjust procedure
My car doesn’t have a way to release the Hatch when i install my blackout – Heres how to fix that issue
The purpose of this article is to guide you through installing a remote hatch release in your Firebird/ Trans-am.
The remote hatch release is something so simple you wonder why GM didn’t install it on all of the cars.
First step is to locate the parts needed to do the install.
The car should already have all the necessary wiring in place. Our only concern is the components that connect to that wiring.
- Locate and obtain an accessory switch panel with the additional mounting point for your new hatch release switch. The two-switch panel is no longer available from GM, last I checked the three switch panel was still around. Check salvage yards or Internet classifieds if you can’t find one locally.
- Locate and obtain the rear hatch release switch. This switch runs about $45 from GM. Part number 10098572. I’d suggest trying to find one in a salvage yard or on the net first, but $45 is a small price to pay for convenience.
- Also you’ll need a relay. The same relay is used for a horn relay on some GM cars also. The GM part number is 25523703 and it runs about $12. Or you can get the Same type, New a little Cheaper here https://www.ebay.com/itm/253489948580?hash=item3b052da7a4:g:tLsAAOSwtc1aqRui
- Locate and obtain a hatch release solenoid. Currently your car will have a small latch with a cable running to the lock cylinder. You’ll need to get the solenoid from GM with a cable to that lock that will replace that assembly. My local Pontiac dealer was unable to find a part meeting that description for 91 so we looked under 87 Camaro as my Iroc used a system that was a direct interchange. The solenoid should run about $25.
- Obtain or make a ground cable from 14 or 16ga automotive grade cable with ring terminals on each end.
Once you have the needed parts you can begin disassembling the car and installing the new parts. We’ll start at the front since its easily accessible.
- Remove the two 7mm screws that hold the switch panel in place. They should be on the bottom side.
- Once they’re out carefully pull the switch panel away from the dash.
- Remove the 7mm screws from any switches currently present and remove them from the panel.
- Locate the hatch release wiring harness. There should be three harnesses behind the panel, one for the hatch release with 4 pins, another for the rear defroster switch and the third for fog lights.
- Remove the foam rubber padding from the harness.
- Connect the new release switch to the harness.
- Reinstall switches into new accessory switch panel.
- Remove the 3 7mm screws retaining the passenger’s side under dash panel and look for a wiring harness with an orange, black, and brown wire. It should have 3 terminals and clips on each side. It may be tucked behind the bundles of wiring near the front.
- Connect the hatch release/horn relay to this connection.
- Reinstall the under dash panel.
- Move to the back under the hatch. Remove the spare tire cover and the panel at the rear of the car covering the hatch pull-down assembly.
- Locate the assembly with the cable from the lock cylinder. It should be attached with one 10mm bolt to the hatch pull-down assembly.
- Remove the 10mm bolt and carefully pry the cable socket off the lock cylinder with a flat blade screwdriver.
- Slip the ring terminal on the ground cable that we made earlier over the 10mm bolt.
- Connect the solenoid cable to the lock cylinder and bolt it in place on the motor with the original 10mm bolt.
- Connect the other end of the ground cable to the ground screw below the hatch pull down.
- Reassemble the interior panels and test the switch.
- When the button is pressed you should hear a pop and the hatch should open. If it doesn’t open then double-check all connections and troubleshoot for a defective component.
The process is rather simple, the hardest part is locating the parts. Any GM dealer should be able to get all the necessary parts in 3-5 business days and they can be installed in an afternoon.
Where can i get the Comlink seen on the show?
This is a question we see often! The man who makes these, and many other wonderful items …Please contact Mark Puette at mpuette@hotmail.com .
This is a good topic, and there’s no one answer. Much depends on what you want to spend, and how technical you are. Also, creativity is a must
Easiest way, and cheapest, is using a sound board app, the one we really use a lot can be downloaded here. There is a free version, but it’s somewhat limited. The paid version is 1.49… works well… pretty easy to setup. And you can download over 4500 audio files on our downloads page . https://play.google.com/store/apps/details?id=ix.com.android.CustomSoundboardPro&hl=en_US
https://www.youtube.com/watch?time_continue=2&v=DLlflhPMsNs&feature=emb_logo
You can add a CPU to your replica, with the software we offer on our site, the Thunder 2000 package, made and programmed by the Talented Mario Ravassi in Italy. Don’t mistake his for the KITT Simulator, an infeior program, which is no where near as advanced or functional. Using the software, takes some time to setup, and design your Macros. Macros are essentially, Input/Out commands. What you want to say, and how KITT responds. You can choose Verbal, or Physical, or Both! You can select humanized mode, and have multiple answers/responses to the same question… KITT will choose at random from a pre-seletced bank of audio files you have designated.. making it seem more like he is doing things as HE wishes =)
The wheels you need are called Turbo Cast. There are 14″ versions and 15″ versions of these wheels. To be screen accurate, you would want to use 15″ wheels. These are getting a bit hard to find in good shape. Some builders will find a shop to refurbish, Or you can use some good ole fashioned elbow grease, and do some cleanup by hand. you can use a few grades of Wet sandpaper on the Smooth edges, start with 800, then 1000, then 1500,. Make sure to use Water, and take your time. when your done, you can use a small buffer, or by hand some polishing compound and make the edges really pop and shine! The other option if you want New, is our Great partner Knight Rider world. Tested, and Beautiful as the day off assembly line thru our link: https://knightindustriesofkentucky.com/site/product/turbocast-hubcaps/

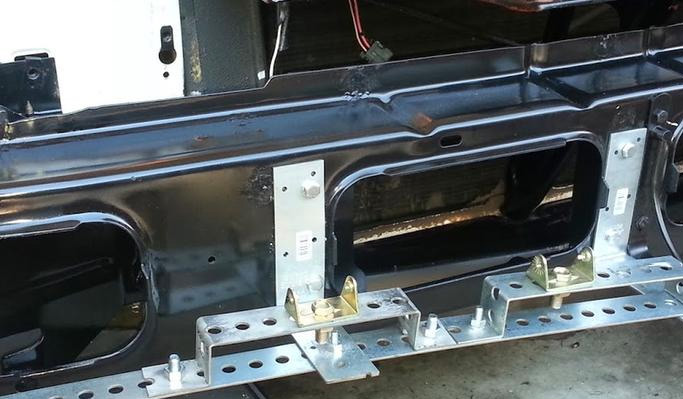
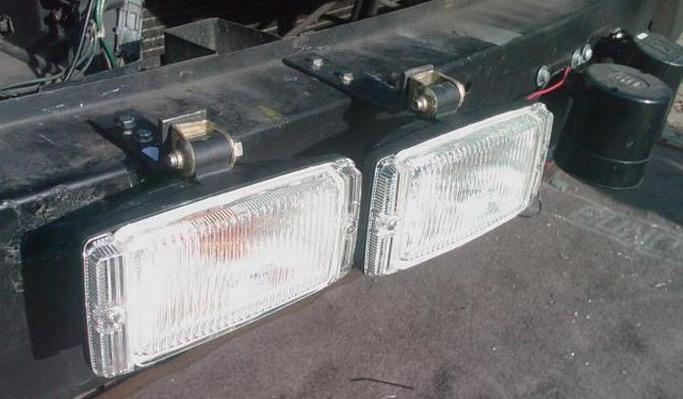
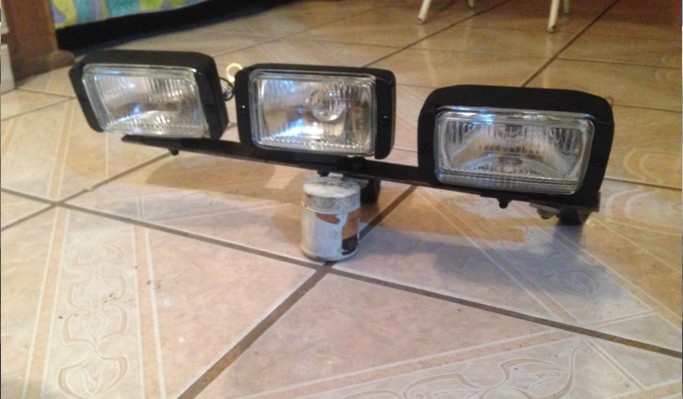
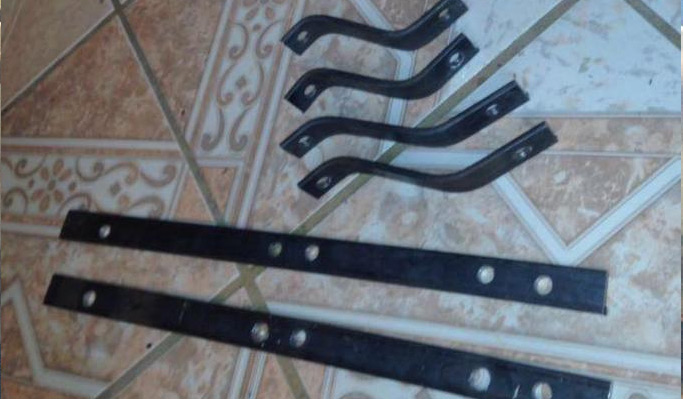
Fog Lights 4 vs 6 / What’s the deal?
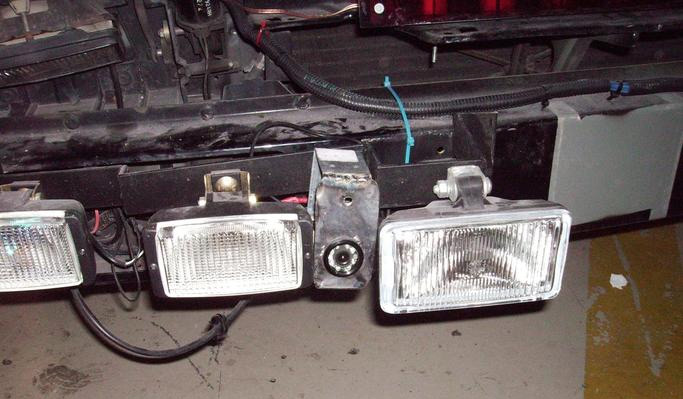
Ok you see some with 2 on each side, and other with 3, What gives you ask? Which is accurate? Well both!
Season one, there was 3 lights per side, Season 2-4, there was 2 lights per side. You may see many variations, as not all builder go for accurate look. In the end, its going to be Your K.I.T.T., so make sure you choose what you like the look of best!
You can choose Halogen, HID or LED, whichever you like the look of best. Xenon bulbs can produce a brighter, whiter light than a halogen bulb, and tend to have a longer lifespan. HID stands for High-Intensity Discharge. The bulb works in a different way to a halogen. Instead of a filament heating up and glowing, HID headlights use electrodes to charge the gas inside the bulb. LED’s have the Lowest power consumption, and typically are much cooler while operating than HID or Halogen.
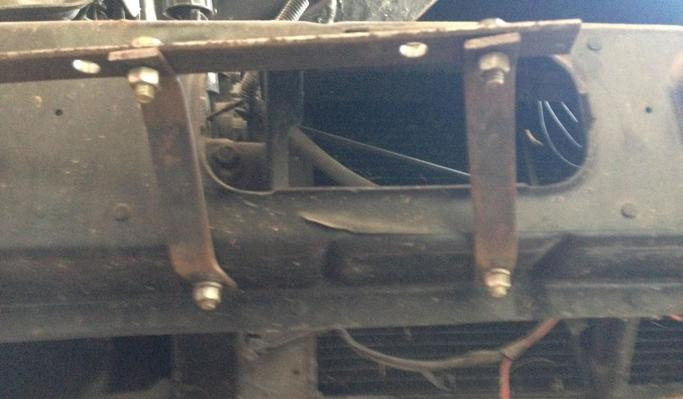
There are Many ways to mount your fog lights. Shown below are several Builder methods. The Show had the lights mounted inside the crash rail, rather than On top or in front. Even if your car doesnt have an opening, you can cut one out and this will assure your lights are perfectly straight, and secure to prevent alot of vibration/movement.
How do I deal with leaks? rust?
Ok so our cars are older, Leaking is a big issue, even from Factory. But, we want to try and get things restored and sealed as best as we can. Several options are available. a Popular one is Soffseal, Generally this is the most costly set. Just the T-Top Weather stripping can run you $250.00.
The same site will offer other pieces as well.
Please be sure to verify your t-top style. There were two types of t-tops, Factory Fisher T-Tops & Cars & Concepts.
The easiest way to quickly identify which type you have is to measure the t-top glass length where the glass fits under the center t-bar: Factory Installed T-Tops (Fisher) = 30 1/4″ & Aftermarket Installed T-Tops (Cars & Concepts) = 28″
If your T-Top Steel channels that the weatherstripping fits into is rusted, you will need to repair, or replace.
Now there are other common leaks you may find, neither by Weatherstripping. Most common is the heater core, This will be evident by Water/Coolant on the passenger side floorboard. You will also smell the coolant inside the car.
The 2nd issue, can be more of a problem.
Just under the windshield, is the “cowl”, the area where the air is pulled in by the AC/Heat Blower. If you remove the plastic trim with screen, you can see into this area. Its common for the Seam sealer in this location to Dry-rot, shrink, crack, and expose the seam between the upper portion of the Cowl, and the Firewall. This will allow water to Consistently seep thru, into the car, More other on the Driver side. This Can cause us Major headaches with Rust, and water running all the way into our back seats. Repairing this requires you to remove the old seam sealer, which is complicated by such a small area, having to reach your arm into a small space and try to remove the old seam-sealer. After its removed, and you’ve cleaned/De-greased the area, You want to put New seam-sealer in place. You NEED to use gloves. this stuff is very messy, and hard to remove from skin, not to mention it will cause skin irritation and or burns.
Another Very common Leak spot is in the rear, Where the Hatch Glass bolts to the roof support. New weatherstripping wont help this, you will need to add either Seam-sealer, or an Elastomeric Silicone. Best to loosen the bolts from inside the car, so you can put the new sealant between the hinge and the body to Effectively stop the water from leaking.
Convertibles will leak in a similar spot, between the deck-lid and tonneau cover. the rail, added by the conversion company, rusts out, allowing water to run into the Trunk, rotting out the trunk-pan. This is Repairable, but not nearly as easy as the T-Top and hard top models
What season dashboard do i want? What are the differences?
The pilot had what we referred to as the dash on dash look and only a few vendors sell this design. If you have the blue-ray, you can see the dash is literally screwed to the top of the factory dash pad in the car. KITT’s voice-box was also different in the 1st season. They used a pair of 5″ portable TV’s in the dashboard.

Season 2 didn’t get much change. the 2 most noticeable differences are KITT’s Voicebox, and his TV’s were smaller (3.5″). Also that season, The Eject L and Eject R, Surveillance Mode, and Computer Printout’s were added. Season 3/4 Dash included different voice-box and countdown. Also now it has compass, single screen, some modifications to pods, and overall changes to the layout of the visual aspects.


Where do I find the blacked out tail lights?
One of the most iconic features on KITT/KARR is the blacked out tail lights. There are a few vendors who sell this unit. Our personal choice is the unit listed on our site, Here’s a link https://knightindustriesofkentucky.com/site/product/blackout-tail-light-cover/ , They are Made in Mexico by our Fabulous business partner Ricardo Vera. Single piece unit, No holes need to be drilled, and makes changing your brake light bulbs Very easy when the need arise.
What kind of colors will I need?
What color do i use to restore the interior plastics?
Great Question. and Knight Rider Historian Joe Huth provided an answer. a Custom made color that matches the Factory GM Plastics as they were made in 1982. You can show a Paint mixing store that carries SEM brand the image below, and they can mix what you need. Best to get it in a Dye, and if you can get them to Aresol it, will make the work so much easier.

The first and most Obvious, Black. We all know this, But there are many variants to choose from, as not all black paint are the same.
We use PPG Deltron DBC2000, Which is a Deep Jet Black used on many GM vehicles. This yields a Beautiful Deep black color. Also, add a little blue or violet to the black to make it look blacker. Finally, You can also Tint your clear, with the same black, which can help create a Deeper look to your paint. Ask your Paint shop about this =) However, Black is the Hardest color to paint, and have look Amazing. Our cars would look Better than the Screen used, because we do Much more work to them to have a Perfectly smooth body. So while Black is the most beautiful color on a car, it ends up being the most Costly, because of the prep work.
History of the surviving cars. Where are they?
A very good question. Despite what you may have heard, they weren’t all crushed, there are 5 Screen used KITTs remaining. But the term screen used, we mean they were used in the filming of the show, between 1982 – 1986.
Knight Rider historians Joe Huth and AJ Palmgren own 2 of the 5. the Right hand Blind drive KITT, belongs to Carl Casper, and has been Stored in a museum in Indiana for years. the Convertible from Season 4 was kept in the Dezer museum in Florida https://www.theconstantrambler.com/miami-automobile-museum-dezer-collection/ .
The 5th is located in the UK…the owners didn’t want their location given out, but AJ Palmgren has verified by traveling there on his own dime for the cause! for more detailed information, check out our partners over at Knight Rider Historians.. https://www.knightriderhistorians.com/ , Or Check out their Official YouTube page! https://www.youtube.com/@KnightRiderHistoriansOfficial

