Frequently Asked Questions!
First off, If the contents of this page are helpful to you, Please give us feedback on any Social media you may be on. Sharing this info , helps future builders know where they can go for Trustworthy and accurate advice! If you have a question, and its not listed, Please reach out on FB, or by email.. Let us know, and we will add to this page to help Everyone!
OK, you have your 82-92 Firebird / Trans am, and you want to begin a conversion. What do you need, what colors, who to buy from, Who to avoid, how to install , How to wire up…the questions come flooding in to your mind. there is so much to take in, KITT / KARR is not an Easy replica, but Extremely rewarding, and so much fun as long as you don’t fall into the Drama pools and Scammer's traps. First, we suggest that you don’t use the word “cheap” lightly. We see this far too often. Nothing in this build will be cheap. Be prepared to spend between $60.00 – $3200.00 in just one purchase. But we will try to help you with guidance on things to help smooth the path ahead, and help you with saving as much as you can. And for those looking at TurnKey replicas to buy, Please be advised, Anyone with the Skill-set, and Real knowledge, will charge around $50k, upwards to $100k to build, and even then, some dont do a very good job. These replica’s are one of the most Difficult to build, Especially if you want the car to be Dependable, and Accurate to the show. If you do not see a Particular question that You have, Please use the form to e-mail us, so that we can Add it to this page, to help Many Future builders!
Scammers/ Who to avoid!
Vendor, Vendor, Vendor, Whodayatrust, hubba hubba hubba ,Whodayatrust????
 OK , So its a Different movie, but you get the jest… That’s Why this site was created, to help remove any and all questions you may have. If its on this page, the vendor who supplies it is 110% Trustworthy, Always striving for excellence, and Always trying to make sure the customer is Completely satisfied. Please pay attention to some of the vendors you see, or some that may be suggested. A Few out there are Novice, and haven’t learned who to trust… We are the Knight Signal in the sky, to help guide you to a Awesome replica! One of our goals is to make sure you have a Fun build, and do not get taken advantage of by Known scammers…. and you don’t have to take Our word for it, Ask on Just about any FB Forum, You can get Unbiased reviews from Customers. Please be Very mindful of where you purchase parts.
The First, and Worst Repeat offender… is Vincenzo Forte, from Bari Italy. He has Multiple Ebay accounts, kitt-vincenzo-knight and kitt-supercar and others, He Registered the Old account name of a Legitimate vendor, KRW, within hours of KRW Changing their Ebay account name to something that Vincenzo couldn’t confuse customers with. a Very Underhanded seller, and his Wife works with him to try and confuse, cheat and steal from Hard working replica builders.He also has a website… knightriderconversion. He is Very aggressive with trying to make sales. To date, we’ve been able to find over $75,000 he has taken in payment, and parts never delivered. He claims always the Best quality parts in the world, However, if you do Very little digging on Facebook, you’ll find Quite the opposite is said. However, it seems he is not that bad about shipping parts to people who live closer to him than USA… Gee, wonder why?
KnightRiderStore, Located in Estonia, Owned by Mr. Alvar Seeburg. He has been Sued, by former customers, for failing to deliver turnkey projects that were paid for, this is Public information that can be obtained from Estonia . Even some of his former suppliers have stopped selling to him because of his thefts. He has gotten a Few people to make claims of getting their items, and being very pleased, however there’s no proof of a transaction. & Weve gotten wind of another customer who fell prey to Alvars lies, and is being sued once again..
Levin Lewis Sr, AKA Levy Metal enterprises. Levin enjoys playing the victim, BooHooing how mistreated he is, and how sick he is. However, he just cant seem to Stop taking peoples orders for parts, 6500, $8000, and other amounts, and then Never completing. in fact, he Ghosts you after you make payment. Regardless of what he tells you, he is New to the community, he likes to say he has been around for years, and took a break. He is Not your friend, and you will most likely loose your money if you listen to his lies.
If you send money to Any of these
scammers
, and you dont get your product, We're sorry. the warnings are here to protect You the builder.
Electronic Questions
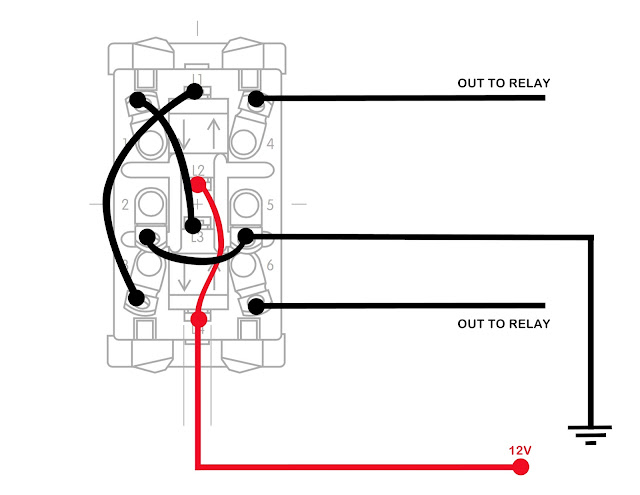
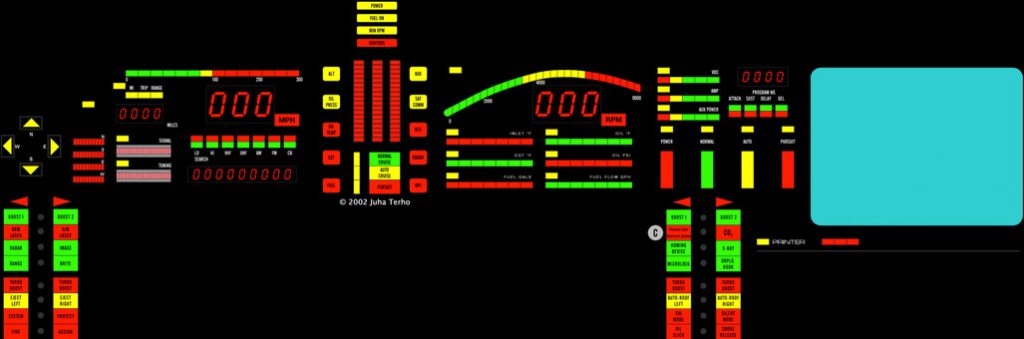
So you’re working on wiring, and you’re hoping to not release the magic smoke? Here we will give you Numerous diagrams, showing you how you can wire your various items in the upper and lower consoles. This section is a bit long, as there is a LOT of electrical in KITT, and we want you to be as prepared as you can be!
This is for the Original Pilot upper consoles Red/Green rocker switches. This shows how to wire it to Light up and Trigger any relays if you want to attach
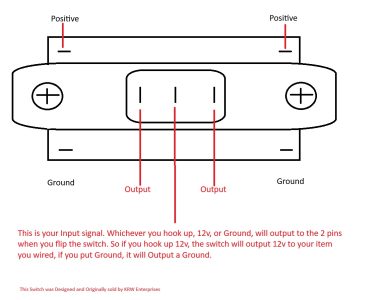
This is for the Aftermarket Pilot upper consoles Red/Green rocker switches available on our site . This shows how to wire it to Light up and Trigger any relays if you want to attach
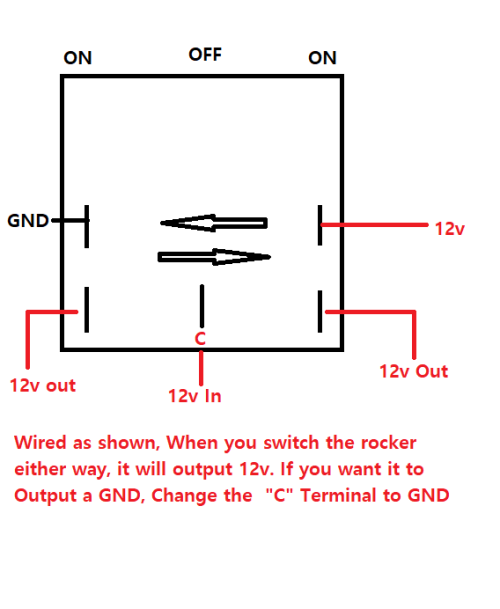
This is for the 4 White rocker switches on the S2 Lower console
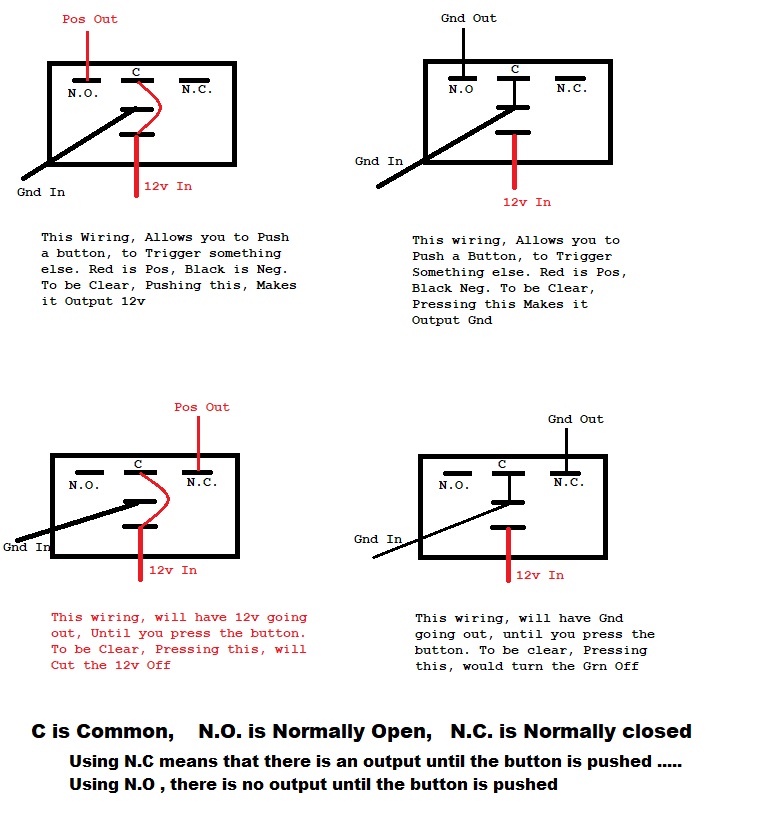
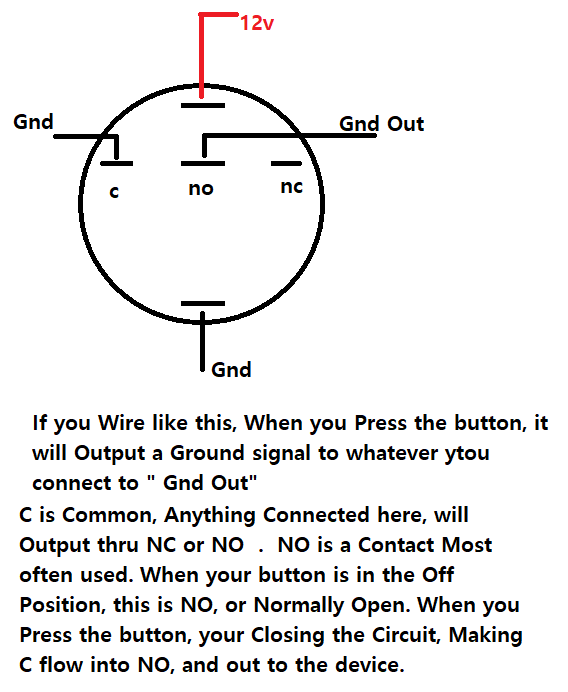
The Season 2 Red and Green push-buttons in the Lower console can be wired in numerous ways, Here are those ways
Have Season 3 Ideegeniali Electronics, and ZA PANP. This is also incorporating the Remote power module v3 on our site designed by from Anthony Giannakis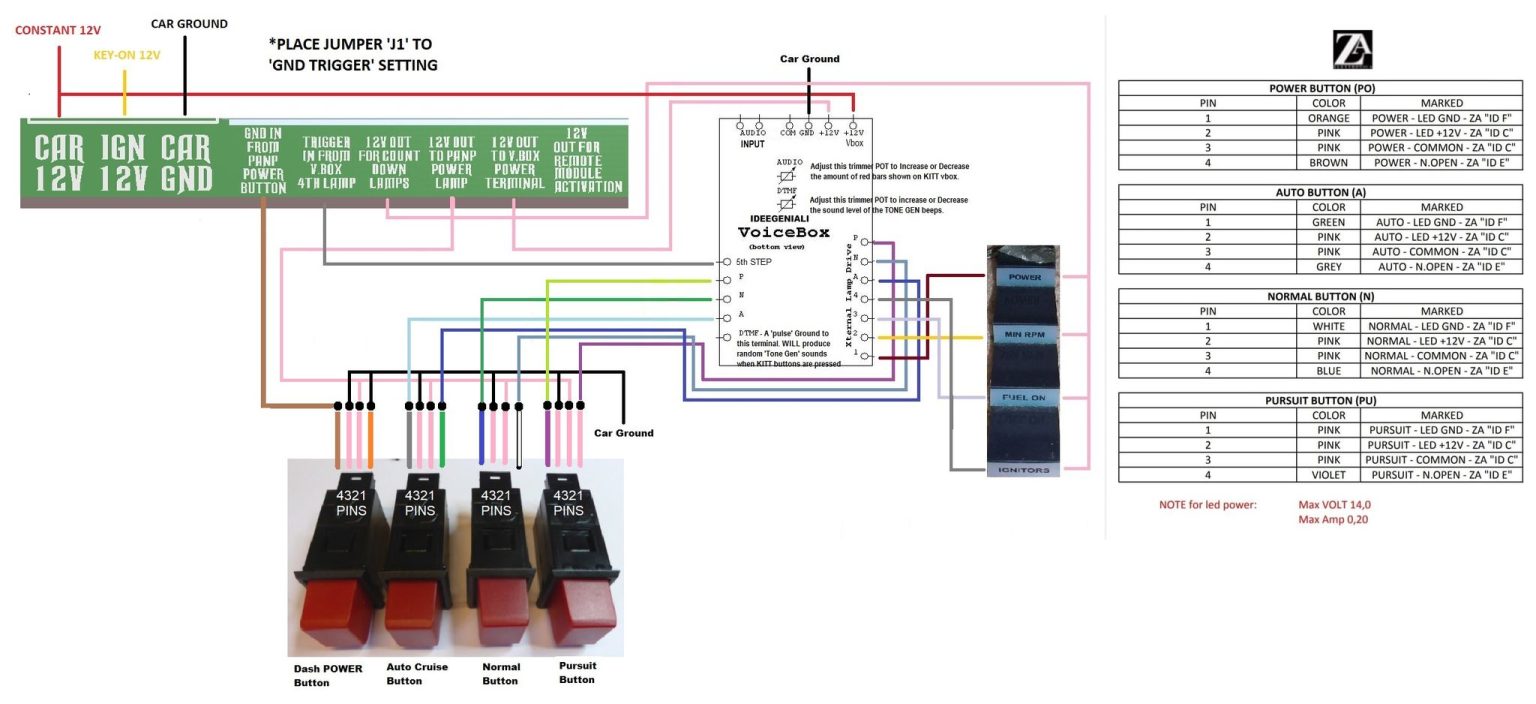
Some of the buttons, like the ones used in Season 2, have connections like shown here. And now you know how to wire them correctly
Batteries , Location & Charging
There are 3 battery types, Lead acid, AGM, and Lithium Ion < Lipo4>. Marine batteries are in the Lead acid category. They do hold up to being discharged much better than Standard lead acid batteries However, If you are going to stick with a Lead acid or Marine battery, you will have to put this under the hood. Lead-acid batteries release hydrogen and oxygen gases when charging, which can be explosive. The gases can be harmful, so it's important to take precautions when handling lead-acid batteries.
What gases are released?
Hydrogen: A colorless, odorless, flammable gas that's lighter than air. It can explode if there's a source of ignition and the air is between 4% and 74% hydrogen.
Oxygen: Supports combustion.
Hydrogen sulfide: A colorless, flammable, poisonous gas that smells like rotten eggs. It's heavier than air and can accumulate in poorly ventilated spaces.
How can these gases be dangerous?
Explosion: The gases can create an explosion if there's a source of ignition.
Fire: Lead-acid batteries can start on fire, though they're less likely to than lithium-ion batteries.
Serious injury: Lead-acid batteries can cause serious injury if not handled correctly.
How can these risks be reduced?
Ventilate the area regularly
Avoid overcharging the battery
AGM, or LiPo. are the choice to put in the rear of the car. If you decide to use a Lithium Ion < LifePo4> battery, you will Need a DC to DC Charger. 40amp is More than sufficient The one we would suggest is Here. Not using this, will lead to a Burnt up Alternator. A DC-to-DC charger is necessary when using a LiPo battery because it provides the precise voltage and current needed to charge the battery safely and efficiently, protecting it from damage by managing the charging stages (bulk, absorption, and float) and preventing overcharging, which can happen if you simply connect it to a standard DC power source like a vehicle alternator that might not deliver the correct charging profile for a lithium battery. Key points about using a DC-DC charger with a LiPo battery:
Proper charging profile:
LiPo batteries require a specific charging curve with different voltage and current levels throughout the charging process, which a dedicated DC-DC charger can accurately deliver.
Alternator protection:
A vehicle's alternator might not be designed to handle the high current demands of a LiPo battery, and a DC-DC charger can regulate the current draw to prevent damage to the alternator.
Battery longevity:
By providing the correct charging parameters, a DC-DC charger can extend the lifespan of your LiPo battery by minimizing stress on the cells
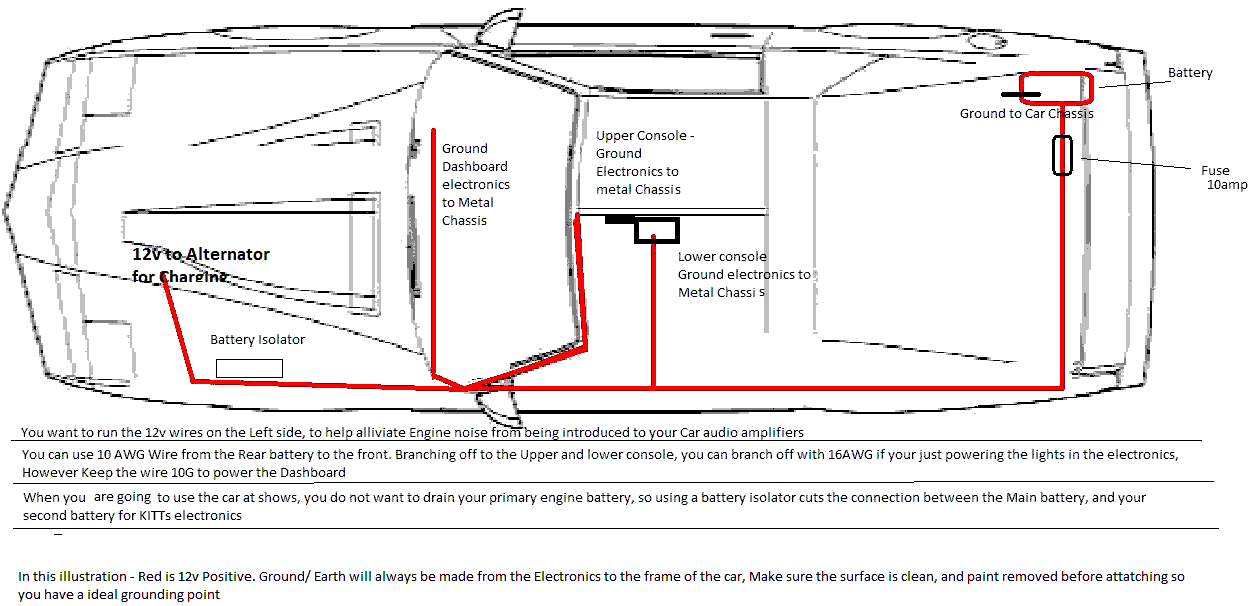
Also, you do not want to run Power wire, on the same side as your Audio, this can end up giving you a nasty "whine" sound in your speakers while the engine is running. Its best, to run all Audio wires < Spear wire, RCA> on the Right side of the car, and all Power on the left.Also, do not use wire designed for useage in Homes. Solid wire, or the Thick stranded wire will not hold up well to the vibrations in cars, and will eventually start breaking. Automotive wire has a Large amount if Thin strands of wire, and considerably more flexible.
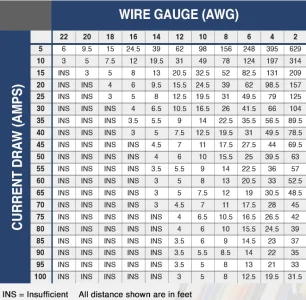
What size wire should i use?
This is a Good question, and has a few factoring conditions. the main 2, are Amp draw, and length of the cable run. Below is a chart that will help you safely choose the right size wire. All products have an amperage draw, so you will look at the information on your device to determine what your application will need. Upper consoles, Lower consoles will be safe to use 16 awg, as they typically are just a handful of LED's and a few incandescent. Dashboard is safe to use 16awg - 10awg as it draws less than 10 amps with everything on. 10 is overkill, but safer to have more than less on wire size.
I Have this Nasty noise in my speakers, like a Whine, and it gets higher when i press the gas, What gives?
This noise, is Alternator "whine", Alternator whine is usually caused by electrical interference from the alternator, often due to poor ground connections, faulty diodes within the alternator, or voltage ripple from the alternator's output, which can then be picked up by sensitive car audio equipment, leading to a whining noise through the speakers when the engine is running. You can help reduce this from happening by making sure you don't run power and Audio wires parallel. You can also use 12v inline noise filters. a reliable model can be found Here. Also, when you ground any item. you want to make sure the steel is clean of any dirt, paint, or rust, otherwise, your going to end up with a bad ground. a Helpful idea, is to put a terminal block close to a central location where you will use need multiple grounds. Something like This is Perfectly suited. from this, you would run One ground wire, to the body of the car..Usually a Larger wire than the grounds going to it. this allows for a Clean, well grounded, and Organized installation.
Exterior Lighting questions
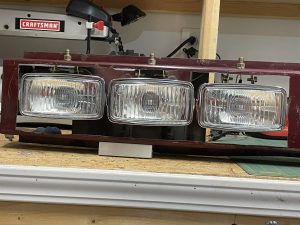
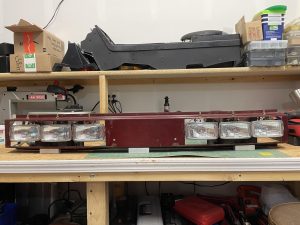
Ok you see some with 2 on each side, and other with 3, What gives you ask? Which is accurate? Well both!
Season one, there was 3 lights per side, Season 2-4, there was 2 lights per side. You may see many variations, as not all builder go for accurate look. In the end, its going to be Your K.I.T.T., so make sure you choose what you like the look of best!
Which Headlights do i choose?
You can choose Halogen, HID or LED, whichever you like the look of best. Xenon bulbs can produce a brighter, whiter light than a halogen bulb, and tend to have a longer lifespan. HID stands for High-Intensity Discharge. The bulb works in a different way to a halogen. Instead of a filament heating up and glowing, HID headlights use electrodes to charge the gas inside the bulb. LED’s have the Lowest power consumption, and typically are much cooler while operating than HID or Halogen. The 1982 - 1990 Firebirds / Trans-am's used a 7x6 headlight. You can convert to LED with ease. a good option can be found Here
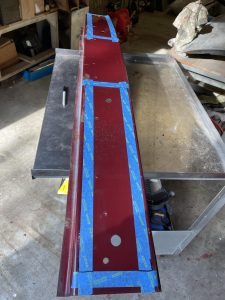
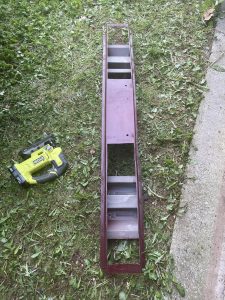
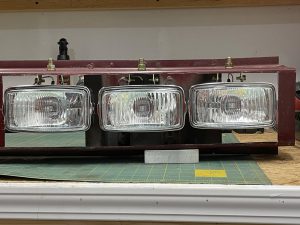
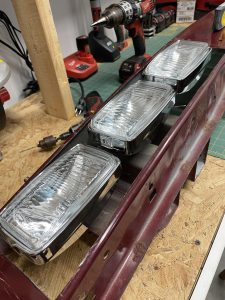
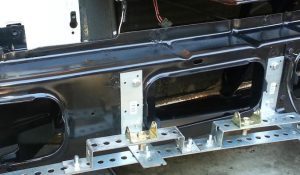
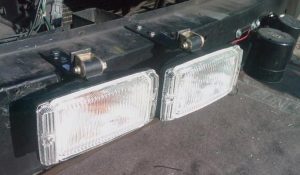
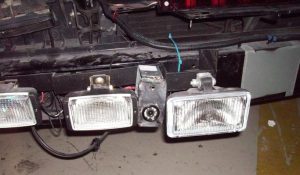
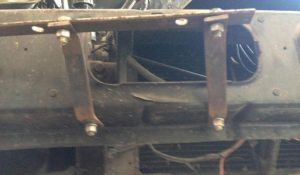
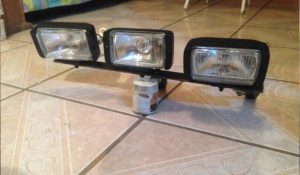
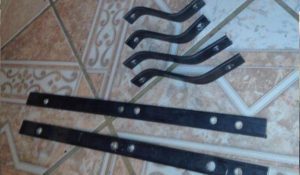
How do I Mount my fog lights?
There are no ” RIGHT” way to mount. Now if you want to mount how they were in the show, you would need a Early style bumper rail, or, modify your existing. Below are a number of photos showing how numerous builders have done theirs

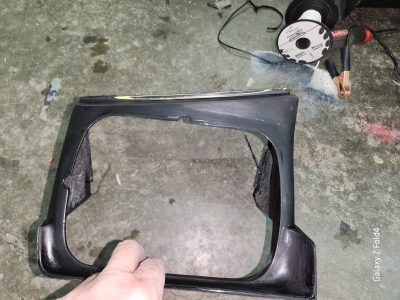
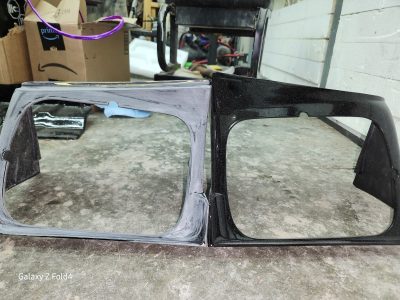
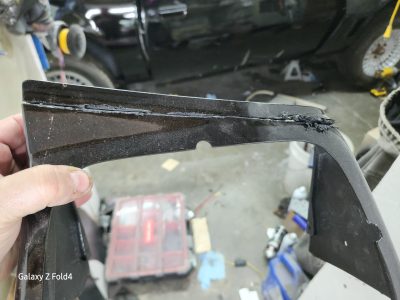
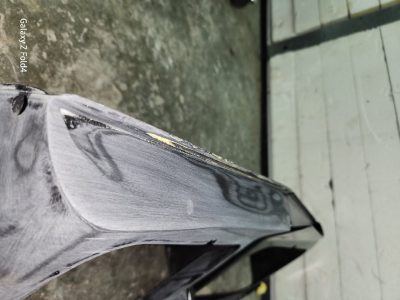
My Headlights wont open or close after i put the bezels on...
OK This is a process very few have discussed... yet Every replica has to deal with. The Factory headlight bezels. When you try to open, or close, hit the bumper.. so what do you do? Well, you gotta do some cutting, Sanding, more sanding, primer and paint. Below we give you some of the Inprogress steps of a customers Factory 86-92 headlight bezel's.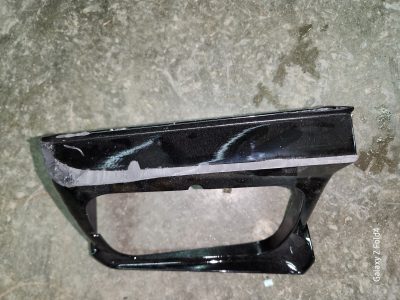

How can i make KITT Talk?
How can i make KITT Talk?
This is a good topic, and there’s no one answer. Much depends on what you want to spend, and how technical you are. Also, creativity is a must
You can Download Character ai, a Wonderful free app that will allow you and others to have near seamless conversations with a very convincing sounding KITT. https://character.ai/chat/L0iiyWC8bUUUme2P4gaSrUrqZI-z2Peo5YAbRyS2ptA
You can use a Mac, for more automated interactions. Chris Blasius did a YouTube tutorial, which you can view here https://www.youtube.com/watch?time_continue=2&v=DLlflhPMsNs&feature=emb_logo
You can add a CPU to your replica, with the software we offer on our site, the Thunder 2000 package, made and programmed by the Talented Mario Ravassi in Italy. Don’t mistake his for the KITT Simulator. Using the software, takes some time to setup, and design your Macros. Macros are essentially, Input/Out commands. What you want to say, and how KITT responds. You can choose Verbal, or Physical, or Both! You can select humanized mode, and have multiple answers/responses to the same question… KITT will choose at random from a pre-seletced bank of audio files you have designated.. making it seem more like he is doing things as HE wishes =)
Questions Reguarding wheels
What wheels do i need?
The wheels you need are called Turbo Cast. There are 14″ versions and 15″ versions of these wheels. To be screen accurate, you would want to use 15″ wheels. These are getting a bit hard to find in good shape. Some builders will find a shop to refurbish, Or you can use some good ole fashioned elbow grease, and do some cleanup by hand. you can use a few grades of Wet sandpaper on the Smooth edges, start with 800, then 1000, then 1500,. Make sure to use Water, and take your time. when your done, you can use a small buffer, or by hand some polishing compound and make the edges really pop and shine! The other option if you want New, is our Great partner Knight Rider world. Tested, and Beautiful as the day off assembly line thru our link: https://knightindustriesofkentucky.com/site/product/turbocast-hubcaps/ . Now KITT had 215 65 R15 installed on his TurboCast wheels, however if you want Wider tires, especially in the rear, the max suggested would be 255/60/15's, as anything wider would make the car handle very poorly on cornering

Questions Reguarding Colors
What color paint for the body?
The first and most Obvious, Black. We all know this, But there are many variants to choose from, as not all black paint are the same.
We use PPG Deltron DBC2000, Which is a Deep Jet Black used on many GM vehicles. This yields a Beautiful Deep black color. Also, add a little blue or violet to the black to make it look blacker. Finally, You can also Tint your clear, with the same black, which can help create a Deeper look to your paint. Ask your Paint shop about this =) However, Black is the Hardest color to paint, and have look Amazing. Our cars would look Better than the Screen used, because we do Much more work to them to have a Perfectly smooth body. So while Black is the most beautiful color on a car, it ends up being the most Costly, because of the prep work.
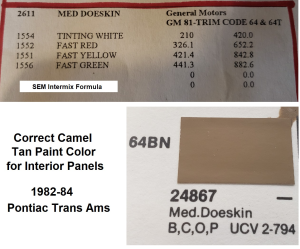
What kind of interior colors will I need?
Great Question. and Knight Rider Historian < https://knightriderhistorians.com/ > Joe Huth provided an answer. a Custom made color that matches the Factory GM Plastics as they were made in 1982. You can show a Paint mixing store that carries SEM brand the image below, and they can mix what you need. Best to get it in a Dye, and if you can get them to Aresol it, will make the work so much easier.
What color Carpet, Seats, Headliner do i need?
This data will get updated soon. Sorry for the inconvenience.
The Headliner is Saddle tan, which We carry the Exact color as used in the 1982 Pontiac’s. the order contains enough to cover your Headliner, and the Sail panels in the back seat. Link to order this is here https://knightindustriesofkentucky.com/product/saddle-tan-head-liner-upholstery/
What are the differences between each Season replica?
What season dashboard do i want? What are the differences?
The pilot had what we referred to as the dash on dash look and only a few vendors sell this design. If you have the blue-ray, you can see the dash is literally screwed to the top of the factory dash pad in the car. KITT’s voice-box was also different in the 1st season. They used a pair of 5″ portable TV’s in the dashboard.
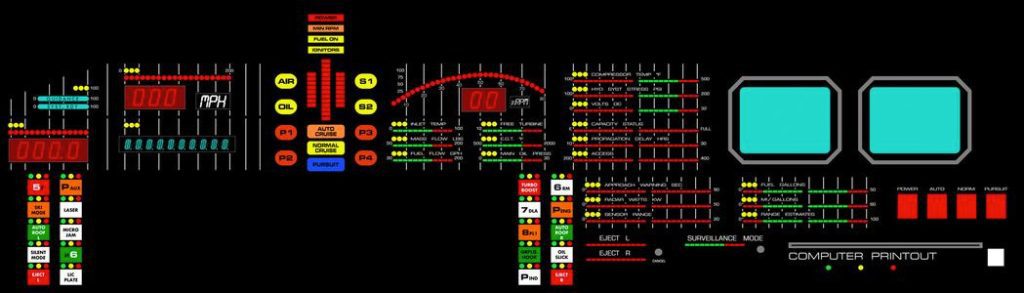
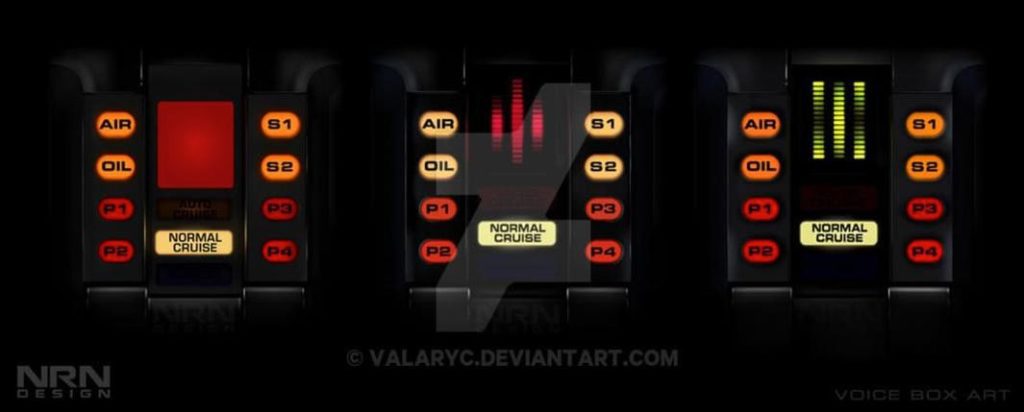
Season 2 didn’t get much change. the 2 most noticeable differences are KITT’s Voicebox, and his TV’s were smaller (3.5″). Also that season, The Eject L and Eject R, Surveillance Mode, and Computer Printout’s were added. Season 3/4 Dash included different voice-box and countdown. Also now it has compass, single screen, some modifications to pods, and overall changes to the layout of the visual aspects.
Check a great art piece by Nick Nugent of NRN Designs, showing the various differences in the voice-boxes, Including K.A.R.R’s.
What about Rust?
So, your looking at a car to use, but you want to know where to look for Rust? Or how to repair rusted areas?
How do I deal with leaks? rust?
Ok so our cars are older, Leaking is a big issue, even from Factory. But, we want to try and get things restored and sealed as best as we can. Several options are available. a Popular one is Soffseal, Generally this is the most costly set. Just the T-Top Weather stripping can run you $250.00.
The same site will offer other pieces as well.
Please be sure to verify your t-top style. There were two types of t-tops, Factory Fisher T-Tops & Cars & Concepts.
The easiest way to quickly identify which type you have is to measure the t-top glass length where the glass fits under the center t-bar: Factory Installed T-Tops (Fisher) = 30 1/4″ & Aftermarket Installed T-Tops (Cars & Concepts) = 28″
You can look several places, but here’s a site where you can get All the seals for your car.
If your T-Top Steel channels that the weatherstripping fits into is rusted, you will need to repair, or replace.
Now there are other common leaks you may find, neither by Weatherstripping. Most common is the heater core, This will be evident by Water/Coolant on the passenger side floorboard. You will also smell the coolant inside the car.
The 2nd issue, can be more of a problem.
Just under the windshield, is the “cowl”, the area where the air is pulled in by the AC/Heat Blower. If you remove the plastic trim with screen, you can see into this area. Its common for the Seam sealer in this location to Dry-rot, shrink, crack, and expose the seam between the upper portion of the Cowl, and the Firewall. This will allow water to Consistently seep thru, into the car, More other on the Driver side. This Can cause us Major headaches with Rust, and water running all the way into our back seats. Repairing this requires you to remove the old seam sealer, which is complicated by such a small area, having to reach your arm into a small space and try to remove the old seam-sealer. After its removed, and you’ve cleaned/De-greased the area, You want to put New seam-sealer in place. You NEED to use gloves. this stuff is very messy, and hard to remove from skin, not to mention it will cause skin irritation and or burns.
Another Very common Leak spot is in the rear, Where the Hatch Glass bolts to the roof support. New weatherstripping wont help this, you will need to add either Seam-sealer, or an Elastomeric Silicone. Best to loosen the bolts from inside the car, so you can put the new sealant between the hinge and the body to Effectively stop the water from leaking.
Convertibles will leak in a similar spot, between the deck-lid and tonneau cover. the rail, added by the conversion company, rusts out, allowing water to run into the Trunk, rotting out the trunk-pan. This is Repairable, but not nearly as easy as the T-Top and hard top models
Where can i get a Comlink, and other items not on This site?
While we try to make this page a 1 stop shop for Everything, sometimes its just not possible. So we will give you the details on who makes some of the other items.
Can i buy a quality Comlink?
Yes! Only 1 person has offered a quality comlink, Mark Puette in Georgia! Contact him via email mpuette@hotmail.com . Or look him up on FB. He has many Great items, and he has put on Southern Knights Atlanta now for 20 years! If you haven't been, its a Definite must attend for Any fan!! https://www.facebook.com/groups/103388956515871/
How do i remove the stock decals without damaging paint?
Removal of Stock Decals
Removing the stock decals, without damaging is something many face. Its not a difficult procedure. A good Decal Remover Eraser Wheel that you would use with your drill would be the most effective method. Can find one Here
What about the Center console?
I Have a 85-92 Pontiac, do i have to do anything to make the 82-84 center console fit?
You will need to use the 82-84 Shift Overlay. The swap is pretty simple. there are a few Fake " Screws" so be careful, otherwise you can buggar them up and look unsightly You will have to drill a new mounting hole. 
What about the blackout?
Where do I find the blacked out tail lights?
One of the most iconic features on KITT/KARR is the blacked out tail lights. There are a few vendors who sell this unit. Our personal choice is the unit listed on our site, Here’s a link https://knightindustriesofkentucky.com/index.php/product/blackout-taillight-cover/ , They are Made in Mexico by our Fabulous business partner Ricardo Vera. Single piece unit, No holes need to be drilled, and makes changing your brake light bulbs Very easy when the need arise.
Blackout installation
Here is a photo showing which brakelights you can, and cannot use. Please make sure what you order is right, as you do not want to pay twice.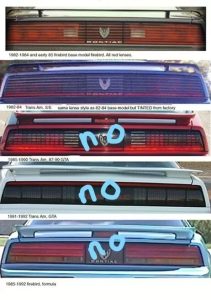
What about the Screen used KITT's?
I heard the screen used cars were destroyed/ Crushed.. Is this true? Do any still exist?
Glad you asked!
A very good question. Despite what you may have heard, they weren’t all crushed, there are 5 Screen used KITT's remaining. But the term screen used, we mean they were used in the filming of the show, between 1982 – 1986.
Knight Rider historians Joe Huth and AJ Palmgren own 2 of the 5. the Right hand Blind drive KITT, belonged to Carl Casper , and was Stored in a museum in Indiana for years until it was sold in 2024, now in the Marconi museum in CA. the Convertible from Season 4 was kept in the Dezer museum in Florida https://www.theconstantrambler.com/miami-automobile-museum-dezer-collection/ .
The 5th is located in the UK…the owners didn’t want their location given out, but AJ Palmgren has verified by traveling there on his own dime for the cause! for more detailed information, check out our partners over at Knight Rider Historians.. https://www.knightriderhistorians.com/ , Or Check out their Official YouTube page! https://www.youtube.com/@KnightRiderHistoriansOfficial
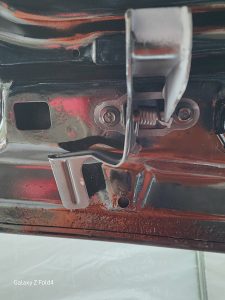
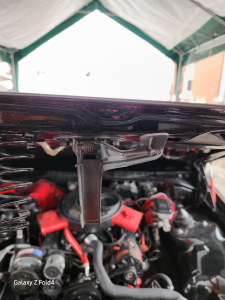
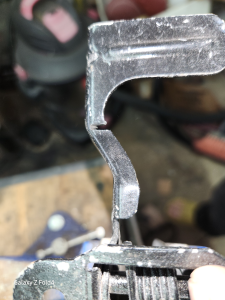
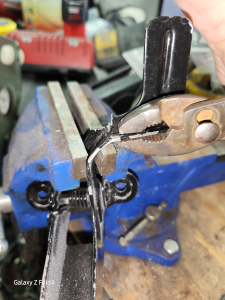
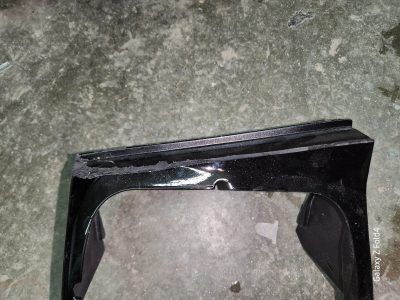
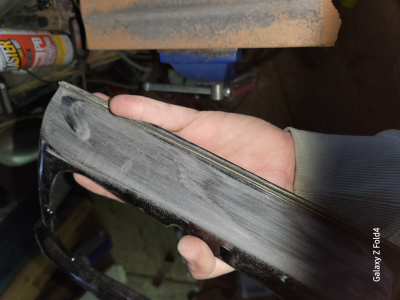
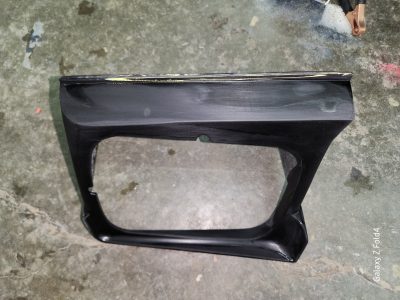
My Hood Latch hits the scanner!
This is a issue Every builder faces. and the solution is rather simple. you must make a 90Degree bend to the hood latch as illustrated in the photos below